自动混合精度训练
作者: Mingyan Jiang
前置教程
相关论文
引言
AMP 代表自动混合精度训练。 在 Colossal-AI 中, 我们结合了混合精度训练的不同实现:
- torch.amp
- apex.amp
- naive amp
| Colossal-AI | 支持张量并行 | 支持流水并行 | fp16 范围 |
|---|---|---|---|
| AMP_TYPE.TORCH | ✅ | ❌ | 在前向和反向传播期间,模型参数、激活和梯度向下转换至 fp16 |
| AMP_TYPE.APEX | ❌ | ❌ | 更细粒度,我们可以选择 opt_level O0, O1, O2, O3 |
| AMP_TYPE.NAIVE | ✅ | ✅ | 模型参数、前向和反向操作,全都向下转换至 fp16 |
前两个依赖于 PyTorch (1.6 及以上) 和 NVIDIA Apex 的原始实现。最后一种方法类似 Apex O2。在这些方法中,Apex-AMP 与张量并行不兼容。这是因为张量是以张量并行的方式在设备之间拆分的,因此,需要在不同的进程之间进行通信,以检查整个模型权重中是否出现 inf 或 nan。我们修改了 torch amp 实现,使其现在与张量并行兼容。
❌️ fp16 与 ZeRO 不兼容
⚠️ 流水并行目前仅支持 naive amp
我们建议使用 torch AMP,因为在不使用流水并行时,它通常比 NVIDIA AMP 提供更好的准确性。
目录
在本教程中,我们将介绍:
AMP 介绍
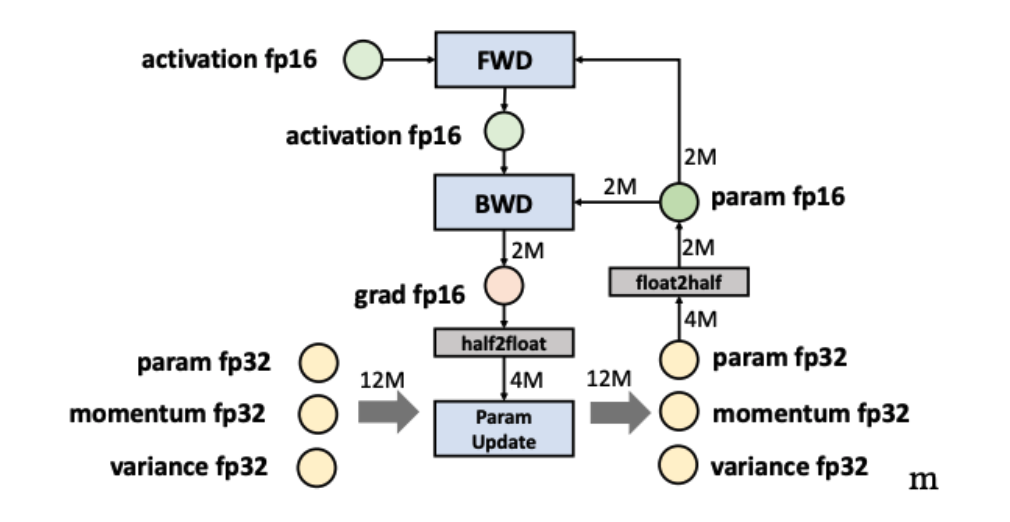
自动混合精度训练是混合 FP16 和 FP32 训练。
半精度浮点格式(FP16)具有较低的算法复杂度和较高的计算效率。此外,FP16 仅需要 FP32 所需的一半存储空间,并节省了内存和网络带宽,从而为大 batch size 和大模型提供了更多内存。
然而,还有其他操作,如缩减,需要 FP32 的动态范围,以避免数值溢出/下溢。因此,我们引入自动混合精度,尝试将每个操作与其相应的数据类型相匹配,这可以减少内存占用并提高训练效率。
Colossal-AI 中的 AMP
我们支持三种 AMP 训练方法,并允许用户在没有改变代码的情况下使用 AMP 进行训练。booster 支持 amp 特性注入,如果您要使用混合精度训练,则在创建 booster 实例时指定mixed_precision参数; 后续将会拓展bf16.
我们目前只支持Linear层的fp8混合精度训练,如果您需要使用,请在创建 plugin实例时指定use_fp8参数。
为了减少低带宽场景下多机之间的通讯负载,我们还支持了FP8通讯。如果您需要使用,请在创建 plugin实例时指定fp8_communication参数。
booster 启动方式
您可以在创建 booster 实例时,指定mixed_precision="fp16"即使用 torch amp。
"""
    初始化映射关系如下:
    'fp16': torch amp
    'fp16_apex': apex amp,
    'bf16': bf16,
    'fp16_naive': naive amp
"""
from colossalai import Booster
booster = Booster(mixed_precision='fp16',...)
或者您可以自定义一个FP16TorchMixedPrecision对象,如
from colossalai.mixed_precision import FP16TorchMixedPrecision
mixed_precision = FP16TorchMixedPrecision(
    init_scale=2.**16,
    growth_factor=2.0,
    backoff_factor=0.5,
    growth_interval=2000)
booster = Booster(mixed_precision=mixed_precision,...)
其他类型的 amp 使用方式也是一样的。
Torch AMP 配置
class
colossalai.booster.mixed_precision.FP16TorchMixedPrecision
- init_scale (float) -- Initial scale factor. Default: 2**16.
- growth_factor (float) -- Factor by which the scale is multiplied during
[
torch.cuda.amp.GradScaler.step] if gradients were found to be finite this iteration. Default: 2.0. - backoff_factor (float) -- Factor by which the scale is multiplied during
[
torch.cuda.amp.GradScaler.step] if gradients were found to be infinite this iteration. Default: 0.5. - growth_interval (int) -- Number of iterations between [
torch.cuda.amp.GradScaler.step] calls that may cause the scale to increase. Default: 2000.
Precision for mixed precision training in FP16 using PyTorch AMP.
Apex AMP 配置
对于这种模式,我们依靠 Apex 实现混合精度训练。我们支持这个插件,因为它允许对混合精度的粒度进行更精细的控制。 例如, O2 水平 (优化器水平 2) 将保持 batch normalization 为 FP32。
如果你想了解更多细节,请参考 Apex Documentation。
class
colossalai.booster.mixed_precision.FP16ApexMixedPrecision
- opt_level(str, optional, default="O1" ) -- Pure or mixed precision optimization level. Accepted values are “O0”, “O1”, “O2”, and “O3”, explained in detail above Apex AMP Documentation.
- cast_model_type (torch.dtype, optional, default=None) -- Casts your model’s parameters and buffers to the desired type.
- patch_torch_functions (bool, optional, default=None) -- Patch all Torch functions and Tensor methods to perform Tensor Core-friendly ops like GEMMs and convolutions in FP16, and any ops that benefit from FP32 precision in FP32.
- keep_batchnorm_fp32 (bool or str, optional, default=None) -- To enhance precision and enable cudnn batchnorm (which improves performance), it’s often beneficial to keep batchnorm weights in FP32 even if the rest of the model is FP16.
- master_weights (bool, optional, default=None) -- Maintain FP32 master weights to accompany any FP16 model weights. FP32 master weights are stepped by the optimizer to enhance precision and capture small gradients.
- loss_scale (float or str, optional, default=None) -- If loss_scale is a float value, use this value as the static (fixed) loss scale. If loss_scale is the string "dynamic", adaptively adjust the loss scale over time. Dynamic loss scale adjustments are performed by Amp automatically.
- cast_model_outputs (torch.dpython --type, optional, default=None): Option to ensure that the outputs of your model(s) are always cast to a particular type regardless of opt_level.
- num_losses(int, optional, default=1) -- Option to tell AMP in advance how many losses/backward passes you plan to use. When used in conjunction with the loss_id argument to
amp.scale_loss, enables Amp to use a different loss scale per loss/backward pass, which can improve stability. If num_losses is left to 1, Amp will still support multiple losses/backward passes, but use a single global loss scale for all of them. - verbosity(int, default=1) -- Set to 0 to suppress Amp-related output.
- min_loss_scale(float, default=None) -- Sets a floor for the loss scale values that can be chosen by dynamic loss scaling. The default value of None means that no floor is imposed. If dynamic loss scaling is not used, min_loss_scale is ignored.
- max_loss_scale(float, default=2.**24 ) -- Sets a ceiling for the loss scale values that can be chosen by dynamic loss scaling. If dynamic loss scaling is not used, max_loss_scale is ignored.
Precision for mixed precision training in FP16 using apex AMP.
Naive AMP 配置
在 Naive AMP 模式中, 我们实现了混合精度训练,同时保持了与复杂张量和流水并行的兼容性。该 AMP 模式将所有操作转为 FP16 。下列代码块展示了该模式的 booster 启动方式。
class
colossalai.booster.mixed_precision.FP16NaiveMixedPrecision
log_num_zeros_in_grad(bool) -- return number of zeros in the gradients.
initial_scale(int) -- initial scale of gradient scaler.
growth_factor(int) -- the growth rate of loss scale.
backoff_factor(float) -- the decrease rate of loss scale.
hysteresis(int) -- delay shift in dynamic loss scaling.
max_scale(int) -- maximum loss scale allowed.
verbose(bool) -- if set to True, will print debug info.
Precision for mixed precision training in FP16 using naive AMP.
当使用colossalai.booster时, 首先需要实例化一个模型、一个优化器和一个标准。将输出模型转换为内存消耗较小的 AMP 模型。如果您的输入模型已经太大,无法放置在 GPU 中,请使用dtype=torch.float16实例化你的模型。或者请尝试更小的模型,或尝试更多的并行化训练技术!
FP8通讯
在低带宽场景下,为了减少多机间的通讯负载,我们支持使用FP8的形式对通讯进行压缩,可以在初始化plugin实例(如GeminiPlugin)时使用fp8_communication=True来启用。此时多机之间all-to-all, all-gather以及P2P操作将使用FP8的格式进行数据传输。受限于NCCL库的支持,目前不支持缩减(Reduction)算子如Allreduce, ReduceScatter的FP8通讯。
实例
下面我们将展现如何在 Colossal-AI 使用 AMP。在该例程中,我们使用 Torch AMP.
步骤 1. 在 train.py 导入相关库
创建train.py并导入必要依赖. 请记得通过命令pip install timm scipy安装scipy和timm。
import os
from pathlib import Path

import torch
from timm.models import vit_base_patch16_224
from titans.utils import barrier_context
from torchvision import datasets, transforms

import colossalai
from colossalai.booster import Booster
from colossalai.booster.plugin import TorchDDPPlugin
from colossalai.logging import get_dist_logger
from colossalai.nn.lr_scheduler import LinearWarmupLR
步骤 2. 初始化分布式环境
我们需要初始化分布式环境。为了快速演示,我们使用launch_from_torch。你可以参考 Launch Colossal-AI
使用其他初始化方法。
# 初始化分布式设置
parser = colossalai.get_default_parser()
args = parser.parse_args()

# launch from torch
colossalai.launch_from_torch()
步骤 3. 创建训练组件
构建你的模型、优化器、损失函数、学习率调整器和数据加载器。注意数据集的路径从环境变量DATA获得。你可以通过 export DATA=/path/to/data 或 Path(os.environ['DATA'])
在你的机器上设置路径。数据将会被自动下载到该路径。
# define the constants
NUM_EPOCHS = 2
BATCH_SIZE = 128
# build model
model = vit_base_patch16_224(drop_rate=0.1)

# build dataloader
train_dataset = datasets.Caltech101(
    root=Path(os.environ['DATA']),
    download=True,
    transform=transforms.Compose([
        transforms.Resize(256),
        transforms.RandomResizedCrop(224),
        transforms.RandomHorizontalFlip(),
        transforms.ToTensor(),
        Gray2RGB(),
        transforms.Normalize([0.5, 0.5, 0.5],
                                [0.5, 0.5, 0.5])
    ]))

# build optimizer
optimizer = torch.optim.SGD(model.parameters(), lr=1e-2, weight_decay=0.1)

# build loss
criterion = torch.nn.CrossEntropyLoss()

# lr_scheduler
lr_scheduler = LinearWarmupLR(optimizer, warmup_steps=50, total_steps=NUM_EPOCHS)
步骤 4. 插入 AMP
创建一个 MixedPrecision 对象(如果需要)及 torchDDPPlugin 对象,调用 colossalai.boost 将所有训练组件转为为 FP16 模式.
plugin = TorchDDPPlugin()
train_dataloader = plugin.prepare_dataloader(train_dataset, batch_size=BATCH_SIZE, shuffle=True, drop_last=True)
booster = Booster(mixed_precision='fp16', plugin=plugin)

# if you need to customize the config, do like this
# >>> from colossalai.mixed_precision import FP16TorchMixedPrecision
# >>> mixed_precision = FP16TorchMixedPrecision(
# >>>     init_scale=2.**16,
# >>>     growth_factor=2.0,
# >>>     backoff_factor=0.5,
# >>>     growth_interval=2000)
# >>> plugin = TorchDDPPlugin()
# >>> booster = Booster(mixed_precision=mixed_precision, plugin=plugin)

# boost model, optimizer, criterion, dataloader, lr_scheduler
model, optimizer, criterion, dataloader, lr_scheduler = booster.boost(model, optimizer, criterion, dataloader, lr_scheduler)
步骤 5. 使用 booster 训练
使用 booster 构建一个普通的训练循环。
model.train()
for epoch in range(NUM_EPOCHS):
    for img, label in enumerate(train_dataloader):
        img = img.cuda()
        label = label.cuda()
        optimizer.zero_grad()
        output = model(img)
        loss = criterion(output, label)
        booster.backward(loss, optimizer)
        optimizer.step()
    lr_scheduler.step()
步骤 6. 启动训练脚本
使用下列命令启动训练脚本,你可以改变 --nproc_per_node 以使用不同数量的 GPU。
colossalai run --nproc_per_node 1 train.py