Auto Mixed Precision Training
Author: Mingyan Jiang
Prerequisite
Related Paper
Introduction
AMP stands for automatic mixed precision training. In Colossal-AI, we have incorporated different implementations of mixed precision training:
- torch.amp
- apex.amp
- naive amp
| Colossal-AI | support tensor parallel | support pipeline parallel | fp16 extent |
|---|---|---|---|
| AMP_TYPE.TORCH | ✅ | ❌ | Model parameters, activation, gradients are downcast to fp16 during forward and backward propagation |
| AMP_TYPE.APEX | ❌ | ❌ | More fine-grained, we can choose opt_level O0, O1, O2, O3 |
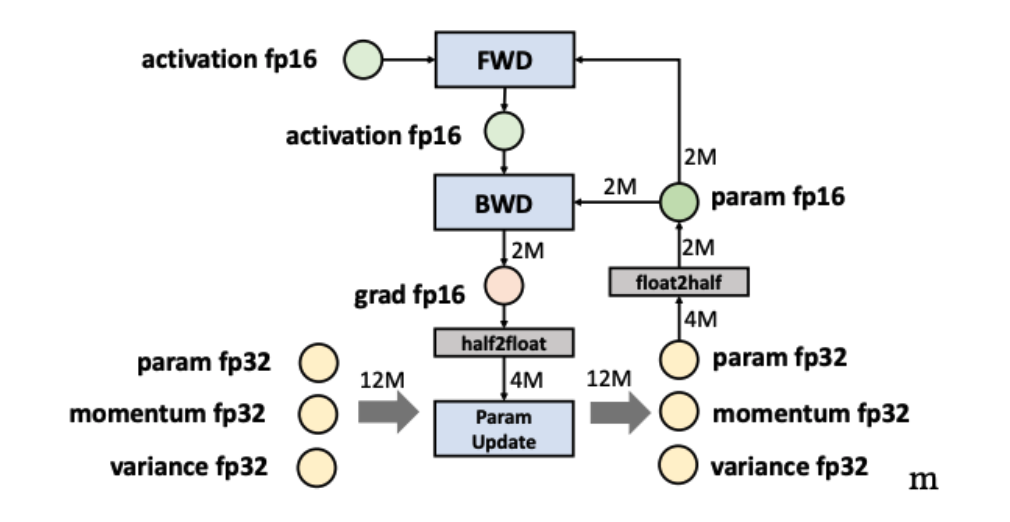
| AMP_TYPE.NAIVE | ✅ | ✅ | Model parameters, forward and backward operations are all downcast to fp16 |
The first two rely on the original implementation of PyTorch (version 1.6 and above) and NVIDIA Apex. The last method is similar to Apex O2 level. Among these methods, apex AMP is not compatible with tensor parallelism. This is because that tensors are split across devices in tensor parallelism, thus, it is required to communicate among different processes to check if inf or nan occurs in the whole model weights. We modified the torch amp implementation so that it is compatible with tensor parallelism now.
❌️ fp16 and zero are not compatible
⚠️ Pipeline only support naive AMP currently
We recommend you to use torch AMP as it generally gives better accuracy than naive AMP if no pipeline is used.
Table of Contents
In this tutorial we will cover:
AMP Introduction
Automatic Mixed Precision training is a mixture of FP16 and FP32 training.
Half-precision float point format (FP16) has lower arithmetic complexity and higher compute efficiency. Besides, fp16 requires half of the storage needed by fp32 and saves memory & network bandwidth, which makes more memory available for large batch size and model size.
However, there are other operations, like reductions, which require the dynamic range of fp32 to avoid numeric overflow/underflow. That's the reason why we introduce automatic mixed precision, attempting to match each operation to its appropriate data type, which can reduce the memory footprint and augment training efficiency.
AMP in Colossal-AI
We supported three AMP training methods and allowed the user to train with AMP with no code. If you want to train with amp, just assign mixed_precision with fp16 when you instantiate the Booster. Next we will support bf16.
Currently we only support fp8 mixed precision training for the Linear layer. Please specify the use_fp8 parameter when create the plugin object.
To reduce the communication volume inter nodes in low-bandwidth scenarios, we support FP8 communication compression. Please specify the fp8_communication parameter when create the plugin object.
Start with Booster
instantiate Booster with mixed_precision="fp16", then you can train with torch amp.
"""
    Mapping:
    'fp16': torch amp
    'fp16_apex': apex amp,
    'bf16': bf16,
    'fp16_naive': naive amp
"""
from colossalai import Booster
booster = Booster(mixed_precision='fp16',...)
or you can create a FP16TorchMixedPrecision object, such as:
from colossalai.mixed_precision import FP16TorchMixedPrecision
mixed_precision = FP16TorchMixedPrecision(
    init_scale=2.**16,
    growth_factor=2.0,
    backoff_factor=0.5,
    growth_interval=2000)
booster = Booster(mixed_precision=mixed_precision,...)
The same goes for other types of amps.
Torch AMP Configuration
class
colossalai.booster.mixed_precision.FP16TorchMixedPrecision
- init_scale (float) -- Initial scale factor. Default: 2**16.
- growth_factor (float) -- Factor by which the scale is multiplied during
[
torch.cuda.amp.GradScaler.step] if gradients were found to be finite this iteration. Default: 2.0. - backoff_factor (float) -- Factor by which the scale is multiplied during
[
torch.cuda.amp.GradScaler.step] if gradients were found to be infinite this iteration. Default: 0.5. - growth_interval (int) -- Number of iterations between [
torch.cuda.amp.GradScaler.step] calls that may cause the scale to increase. Default: 2000.
Precision for mixed precision training in FP16 using PyTorch AMP.
Apex AMP Configuration
For this mode, we rely on the Apex implementation for mixed precision training. We support this plugin because it allows for finer control on the granularity of mixed precision. For example, O2 level (optimization level 2) will keep batch normalization in fp32.
If you look for more details, please refer to Apex Documentation.
class
colossalai.booster.mixed_precision.FP16ApexMixedPrecision
- opt_level(str, optional, default="O1" ) -- Pure or mixed precision optimization level. Accepted values are “O0”, “O1”, “O2”, and “O3”, explained in detail above Apex AMP Documentation.
- cast_model_type (torch.dtype, optional, default=None) -- Casts your model’s parameters and buffers to the desired type.
- patch_torch_functions (bool, optional, default=None) -- Patch all Torch functions and Tensor methods to perform Tensor Core-friendly ops like GEMMs and convolutions in FP16, and any ops that benefit from FP32 precision in FP32.
- keep_batchnorm_fp32 (bool or str, optional, default=None) -- To enhance precision and enable cudnn batchnorm (which improves performance), it’s often beneficial to keep batchnorm weights in FP32 even if the rest of the model is FP16.
- master_weights (bool, optional, default=None) -- Maintain FP32 master weights to accompany any FP16 model weights. FP32 master weights are stepped by the optimizer to enhance precision and capture small gradients.
- loss_scale (float or str, optional, default=None) -- If loss_scale is a float value, use this value as the static (fixed) loss scale. If loss_scale is the string "dynamic", adaptively adjust the loss scale over time. Dynamic loss scale adjustments are performed by Amp automatically.
- cast_model_outputs (torch.dpython --type, optional, default=None): Option to ensure that the outputs of your model(s) are always cast to a particular type regardless of opt_level.
- num_losses(int, optional, default=1) -- Option to tell AMP in advance how many losses/backward passes you plan to use. When used in conjunction with the loss_id argument to
amp.scale_loss, enables Amp to use a different loss scale per loss/backward pass, which can improve stability. If num_losses is left to 1, Amp will still support multiple losses/backward passes, but use a single global loss scale for all of them. - verbosity(int, default=1) -- Set to 0 to suppress Amp-related output.
- min_loss_scale(float, default=None) -- Sets a floor for the loss scale values that can be chosen by dynamic loss scaling. The default value of None means that no floor is imposed. If dynamic loss scaling is not used, min_loss_scale is ignored.
- max_loss_scale(float, default=2.**24 ) -- Sets a ceiling for the loss scale values that can be chosen by dynamic loss scaling. If dynamic loss scaling is not used, max_loss_scale is ignored.
Precision for mixed precision training in FP16 using apex AMP.
Naive AMP Configuration
In Naive AMP mode, we achieved mixed precision training while maintaining compatibility with complex tensor and pipeline parallelism. This AMP mode will cast all operations into fp16. The following code block shows the mixed precision api for this mode.
class
colossalai.booster.mixed_precision.FP16NaiveMixedPrecision
log_num_zeros_in_grad(bool) -- return number of zeros in the gradients.
initial_scale(int) -- initial scale of gradient scaler.
growth_factor(int) -- the growth rate of loss scale.
backoff_factor(float) -- the decrease rate of loss scale.
hysteresis(int) -- delay shift in dynamic loss scaling.
max_scale(int) -- maximum loss scale allowed.
verbose(bool) -- if set to True, will print debug info.
Precision for mixed precision training in FP16 using naive AMP.
When using colossalai.booster, you are required to first instantiate a model, an optimizer and a criterion.
The output model is converted to AMP model of smaller memory consumption.
If your input model is already too large to fit in a GPU, please instantiate your model weights in dtype=torch.float16.
Otherwise, try smaller models or checkout more parallelization training techniques!
FP8 Communication
In low-bandwidth scenarios, to reduce the communication load multiple nodes, we support FP8 communication compression, which can be enabled by using fp8_communication=True when you when create the plugin object (such as GeminiPlugin). The all-to-all, all-gather and P2P operations inter nodes will use FP8 format for data transmission. Currently the FP8 communication of reduction operators such as all-reduce and reduce-scatter is currently not supported due to lack of support of the NCCL library.
Hands-on Practice
Now we will introduce the use of AMP with Colossal-AI. In this practice, we will use Torch AMP as an example.
Step 1. Import libraries in train.py
Create a train.py and import the necessary dependencies. Remember to install scipy and timm by running
pip install timm scipy.
import os
from pathlib import Path

import torch
from timm.models import vit_base_patch16_224
from titans.utils import barrier_context
from torchvision import datasets, transforms

import colossalai
from colossalai.booster import Booster
from colossalai.booster.plugin import TorchDDPPlugin
from colossalai.logging import get_dist_logger
from colossalai.nn.lr_scheduler import LinearWarmupLR
Step 2. Initialize Distributed Environment
We then need to initialize distributed environment. For demo purpose, we uses launch_from_torch. You can refer to Launch Colossal-AI
for other initialization methods.
# initialize distributed setting
parser = colossalai.get_default_parser()
args = parser.parse_args()

# launch from torch
colossalai.launch_from_torch()
Step 3. Create training components
Build your model, optimizer, loss function, lr scheduler and dataloaders. Note that the root path of the dataset is
obtained from the environment variable DATA. You may export DATA=/path/to/data or change Path(os.environ['DATA'])
to a path on your machine. Data will be automatically downloaded to the root path.
# define the constants
NUM_EPOCHS = 2
BATCH_SIZE = 128

# build model
model = vit_base_patch16_224(drop_rate=0.1)

# build dataloader
train_dataset = datasets.Caltech101(
    root=Path(os.environ['DATA']),
    download=True,
    transform=transforms.Compose([
        transforms.Resize(256),
        transforms.RandomResizedCrop(224),
        transforms.RandomHorizontalFlip(),
        transforms.ToTensor(),
        Gray2RGB(),
        transforms.Normalize([0.5, 0.5, 0.5],
                                [0.5, 0.5, 0.5])
    ]))

# build optimizer
optimizer = torch.optim.SGD(model.parameters(), lr=1e-2, weight_decay=0.1)

# build loss
criterion = torch.nn.CrossEntropyLoss()

# lr_scheduler
lr_scheduler = LinearWarmupLR(optimizer, warmup_steps=50, total_steps=NUM_EPOCHS)
Step 4. Inject AMP Feature
Create a MixedPrecision(if needed) and TorchDDPPlugin object, call colossalai.boost convert the training components to be running with FP16.
plugin = TorchDDPPlugin()
train_dataloader = plugin.prepare_dataloader(train_dataset, batch_size=BATCH_SIZE, shuffle=True, drop_last=True)
booster = Booster(mixed_precision='fp16', plugin=plugin)

# if you need to customize the config, do like this
# >>> from colossalai.mixed_precision import FP16TorchMixedPrecision
# >>> mixed_precision = FP16TorchMixedPrecision(
# >>>     init_scale=2.**16,
# >>>     growth_factor=2.0,
# >>>     backoff_factor=0.5,
# >>>     growth_interval=2000)
# >>> plugin = TorchDDPPlugin()
# >>> booster = Booster(mixed_precision=mixed_precision, plugin=plugin)

# boost model, optimizer, criterion, dataloader, lr_scheduler
model, optimizer, criterion, dataloader, lr_scheduler = booster.boost(model, optimizer, criterion, dataloader, lr_scheduler)
Step 5. Train with Booster
Use booster in a normal training loops.
model.train()
for epoch in range(NUM_EPOCHS):
    for img, label in enumerate(train_dataloader):
        img = img.cuda()
        label = label.cuda()
        optimizer.zero_grad()
        output = model(img)
        loss = criterion(output, label)
        booster.backward(loss, optimizer)
        optimizer.step()
    lr_scheduler.step()
Step 6. Invoke Training Scripts
Use the following command to start the training scripts. You can change --nproc_per_node to use a different number of GPUs.
colossalai run --nproc_per_node 1 train.py