Gradient Clipping
Author: Mingyan Jiang
Prerequisite
Related Paper
Introduction
In order to speed up training process and seek global optimum for better performance, more and more learning rate schedulers have been proposed. People turn to control learning rate to adjust descent pace during training, which makes gradient vector better to be uniformed in every step. In that case, the descent pace can be controlled as expected. As a result, gradient clipping, a technique which can normalize the gradient vector to circumscribe it in a uniformed length, becomes indispensable for those who desire their better performance of their models.
You do not have to worry about implementing gradient clipping when using Colossal-AI, we support gradient clipping in a powerful and convenient way. All you need is just an additional command in your configuration file.
Why you should use gradient clipping provided by Colossal-AI
The reason of why we do not recommend users to write gradient clipping by themselves is that naive gradient clipping may fail when applying tensor parallelism, pipeline parallelism or MoE.
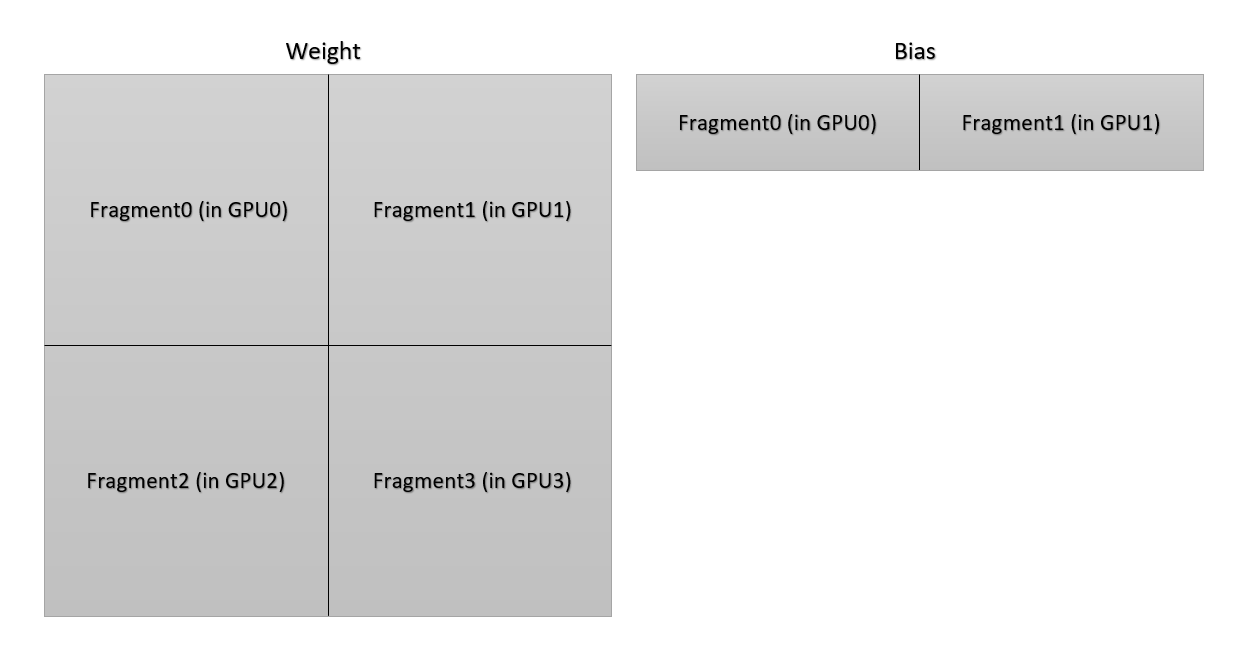
According to the illustration below, each GPU only owns a portion of parameters of the weight in a linear layer. To get correct norm of gradient vector of the weight of the linear layer, the norm of every gradient vector in each GPU should be summed together. More complicated thing is that the distribution of bias is different from the distribution of the weight. The communication group is different in the sum operation.
(PS: This situation is an old version of 2D parallelism, the implementation in the code is not the same. But it is a good example about the difficulty to unify all communication in gradient clipping.)
Do not worry about it, since Colossal-AI have handled it for you.
Usage
To use gradient clipping, you can just add the following code to your configuration file, and after boosted, you can call clip_grad_by_norm or clip_grad_by_value method of optimizer, if it support clip gradients.
Hands-On Practice
We now demonstrate how to use gradient clipping. In this example, we set the gradient clipping vector norm to be 1.0.
step 1. Import libraries in train.py
Create a train.py and import the necessary dependencies.
import os
from pathlib import Path

import torch
from torchvision import transforms
from torchvision.datasets import CIFAR10
from torchvision.models import resnet34
from tqdm import tqdm

import colossalai
from colossalai.booster import Booster
from colossalai.booster.plugin import TorchDDPPlugin
from colossalai.logging import get_dist_logger
from colossalai.nn.lr_scheduler import CosineAnnealingLR
Step 2. Initialize Distributed Environment
We then need to initialize distributed environment. For demo purpose, we uses launch_from_torch. You can refer to Launch Colossal-AI
for other initialization methods.
colossalai.launch_from_torch()
logger = get_dist_logger()
Step 3. Create training components
Build your model, optimizer, loss function, lr scheduler and dataloaders. Note that the root path of the dataset is obtained from the environment variable DATA. You may export DATA=/path/to/data or change Path(os.environ['DATA']) to a path on your machine. Data will be automatically downloaded to the root path.
# define training hyperparameters
NUM_EPOCHS = 200
BATCH_SIZE = 128
GRADIENT_CLIPPING = 0.1
# build resnet
model = resnet34(num_classes=10)
# build dataloaders
train_dataset = CIFAR10(root=Path(os.environ.get('DATA', './data')),
                        download=True,
                        transform=transforms.Compose([
                            transforms.RandomCrop(size=32, padding=4),
                            transforms.RandomHorizontalFlip(),
                            transforms.ToTensor(),
                            transforms.Normalize(mean=[0.4914, 0.4822, 0.4465], std=[0.2023, 0.1994, 0.2010]),
                        ]))
# build criterion
criterion = torch.nn.CrossEntropyLoss()

# optimizer
optimizer = torch.optim.SGD(model.parameters(), lr=0.1, momentum=0.9, weight_decay=5e-4)

# lr_scheduler
lr_scheduler = CosineAnnealingLR(optimizer, total_steps=NUM_EPOCHS)
Step 4. Inject Gradient Clipping Feature
Create a TorchDDPPlugin object and Booster object, get a data loader from plugin, then boost all training components.
plugin = TorchDDPPlugin()
booster = Booster(mixed_precision='fp16', plugin=plugin)
train_dataloader = plugin.prepare_dataloader(train_dataset, batch_size=BATCH_SIZE, shuffle=True, drop_last=True)
model, optimizer, criterion, train_dataloader, lr_scheduler = booster.boost(model,optimizer, criterion,train_dataloader, lr_scheduler)
Step 5. Train with Booster
Use booster in a normal training loops.
# verify gradient clipping
model.train()
for idx, (img, label) in enumerate(train_dataloader):
    img = img.cuda()
    label = label.cuda()

    model.zero_grad()
    output = model(img)
    train_loss = criterion(output, label)
    booster.backward(train_loss, optimizer)
    optimizer.clip_grad_by_norm(max_norm=GRADIENT_CLIPPING)
    optimizer.step()
    lr_scheduler.step()

    ele_1st = next(model.parameters()).flatten()[0]
    logger.info(f'iteration {idx}, loss: {train_loss}, 1st element of parameters: {ele_1st.item()}')

    # only run for 4 iterations
    if idx == 3:
        break
Step 6. Invoke Training Scripts
You can run the script using this command:
colossalai run --nproc_per_node 1 train.py